
Watch the full walkthrough: How to Add or Remove Members in Empath (8:33)
What you need
You need the Manager or Admin role in your tenant. When you have access, Admin appears in the top navigation alongside Dashboard and Library.
Each member needs an email address at a valid, working domain so they can log in. Use an address from your company's Microsoft Entra or Google Workspace where you can. Personal email addresses, such as Gmail, are not supported. Empath does not block the invitation, but a member with a personal address can sign in with a magic link only.
If your members sign in through Microsoft Entra, the email address you invite must match the domain in Entra.
Invitation emails come from notifications@app.empathmsp.com. Allow that address in your email system so spam filters do not block the invitations.
Add a member
- Open the Members page. Click Admin in the top navigation, or open your profile menu and select Settings, then go to Admin. Select Members in the left-hand navigation. Both routes open the same screen, and every member action in this article starts there. Watch this step (0:27)
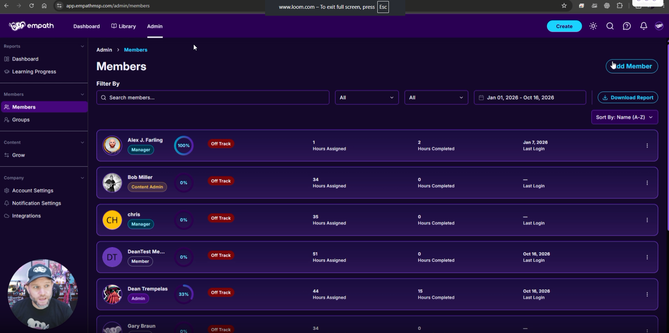
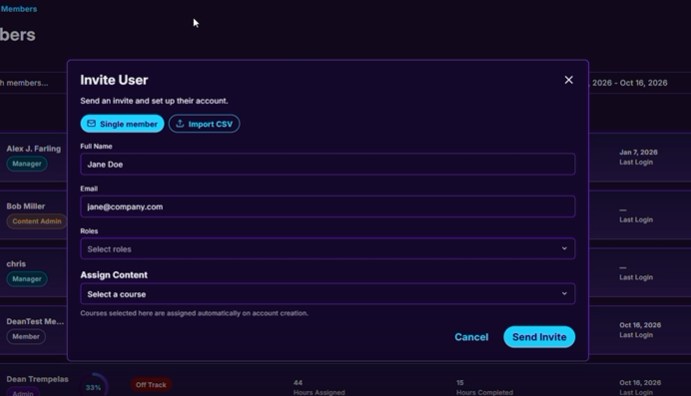
- Click Add Member. The Invite User window opens. Make sure Single member is selected. Watch this step (1:19)
- Enter the member's Full Name and Email, then select their Roles. You can select more than one, such as Member, Manager, and Content Admin.
- Optionally, under Assign Content, select a course. Courses selected here are assigned automatically when the account is created. Empath recommends this for new hires, so their onboarding content is waiting on their first day.
- Click Send Invite. Empath confirms that the invite was sent. Watch this step (5:37)
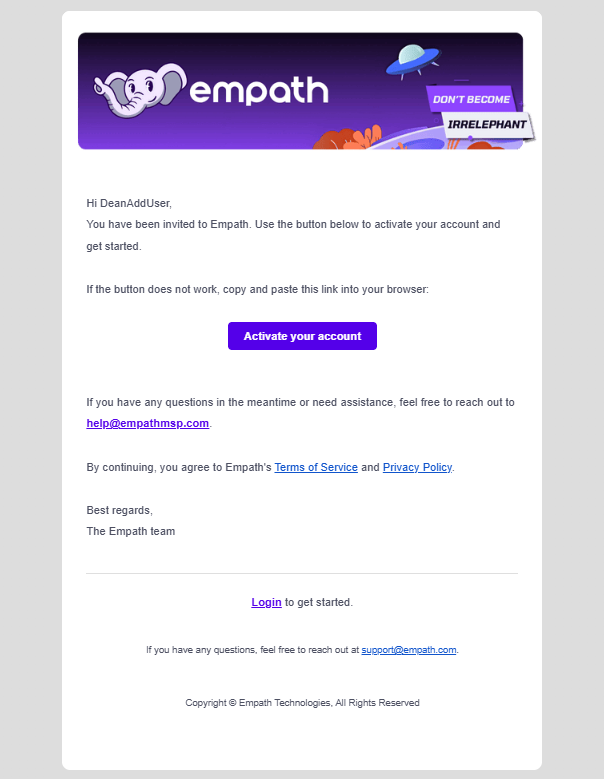
The member receives an email from notifications@app.empathmsp.com that says they have been invited to Empath. It includes a button they select to activate their account. Watch the invitation email (6:37)
Add many members with a CSV
- In the Invite User window, select Import CSV. Watch this step (2:48)
- If you need the template, select Download CSV Template.
- Fill in the template with one row per person. It has three columns:
name,email, androles. Enter the person's name, their email address, and their roles, with commas between multiple roles. Add as many rows as you need. - Upload the completed file, or drag it into the import window, to add the whole list of members at once.
If the invitation will not send
"A user with this email already exists."
This error means the email address already belongs to an Empath user. One email address cannot be in more than one tenant, so check which case applies:
- The person is already in your tenant. You cannot add them twice.
- The person tried to log in on their own before you invited them. Empath does not support SCIM provisioning, so signing in without an invitation creates a separate tenant for that person. That tenant and its user must be deleted before you can invite them, and that requires a support ticket. See Support below.
- The person is in another partner's tenant, such as a consultant who works with more than one partner. Raise a support ticket, or ask them for a different email address. See Support below.
"Identity provider request failed"
This error appears when you add a member and your account has reached its seat limit. Accounts on consumption pricing should not see it. Accounts on annual contracts or special agreements can, and Empath does not show in the interface which applies to your account.
For what counts toward your seats and how to fix it, see FAQ: Why Am I Getting an Identity Provider Request Failed Error When Adding a User?.
Confirm the member was added
Return to the Members list. The new member appears there. Open the member's record to see their assigned content, recent activity, and last login. A member who has not activated their account yet has no recent activity and no last login. Watch this step (7:20)
If the member did not get the invitation
Resend it from either place:
- In the Members list, click the three-dot menu next to the member and select Resend invitation email.
- Open the member's record and resend the activation link. This option goes away after the member activates their account for the first time.
If the invitation still does not arrive, confirm that notifications@app.empathmsp.com is allowed in your email system, then see Support below.
Remove a member
Deactivating and deleting are different actions. Deleting is permanent. Read the table before you choose.
- Go to Admin > Members and find the member in the list. Watch this step (3:39)
- Click the three-dot menu next to their name. The menu includes View details, Resend invitation email, Edit groups, and Assign content. Select View details to reach account-level options. [SCREENSHOT NEEDED: three-dot menu open on a member row showing View details, Resend invitation email, Edit groups, and Assign content]
- In the member's details, open Privacy and Security. Under Manage Account, choose Deactivate account or Delete account. Watch this step (4:14) [SCREENSHOT NEEDED: Privacy and Security tab with the Manage Account options visible]
| Action | What it does | Training data | License |
|---|---|---|---|
| Deactivate account | Prevents the member from logging in | Kept | Stays in use |
| Delete account | Removes the member from the platform | Deleted | Freed |
Deactivate account is not available for a member who has never logged in, because there is no active account to deactivate. To remove that member, delete the account.
- If you chose Delete account, confirm the deletion in the pop-up. The pop-up explains that the member is permanently removed. Empath then confirms that the account was deleted. Watch this step (8:04)
Support
If someone in your organization can access Empath, use the in-app chat bubble.
If you cannot access Empath at all, email support@empathmsp.com.
Include the affected member's email address, what you tried to do, what you expected to happen, what happened instead, any exact error text, and a screenshot or recording.